Microcement Shower Walls
monolithic shower wall coatings
10/30/20253 min read
Microcement/MicroTek Shower Walls
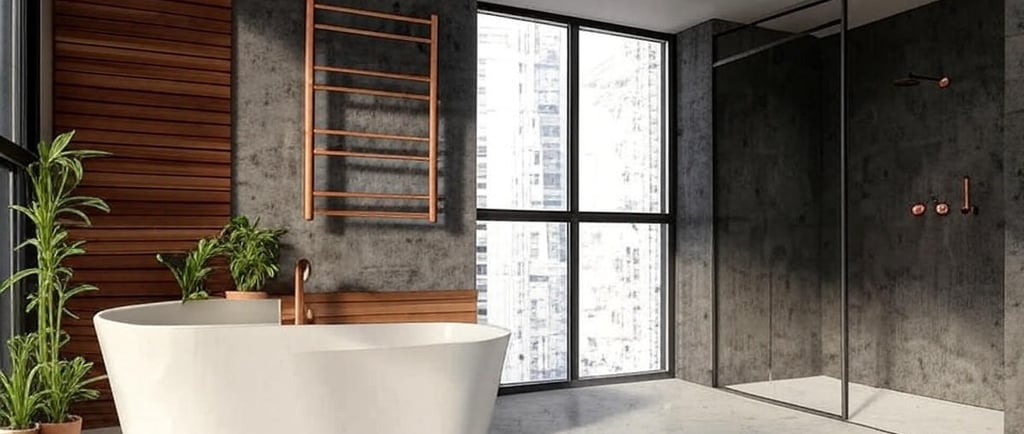
Microcement Shower Walls: A Modern, Seamless Alternative to Tiles
Microcement shower walls offer homeowners a sleek, high-end finish that's easier to install than traditional tiles while delivering stunning visual appeal. Originally developed in the 1950s for repairing industrial floors, this liquid polymer has evolved into a versatile coating available in various textures and colors.
Key features like improved compressive strength, water resistance, and low thermal diffusion make microcement an ideal shower wall surround. In France, a popular variant called béton ciré is often praised for its "industrial chic" aesthetic.
What is Microcement?
Microcement is a decorative coating made from a cementitious mixture applied to vertical or horizontal surfaces to achieve a custom finish. It enhances aesthetics while creating an impervious barrier against water and environmental damage.
Brand compositions vary, but the core typically includes cement, water-based resins, and mineral pigments. Eco-friendly options incorporate recycled glass to boost compressive strength and abrasion resistance. Hybrid cements may be added for stability, binding, and crack prevention.
Alternative names include microconcrete, microtop, and béton ciré.
Applied in thin layers (2–3 mm) with cement binders, microcement adheres to nearly any stable surface, including marble, porcelain, ceramic, natural stone, drywall, wood, plasterboard, fiberboard, and metal.
Finishes range from glossy, matte, smooth, or textured, making it suitable for residential bathrooms, kitchens, and commercial or industrial spaces.
Microcement shower wall kits simplify application for skilled DIYers, but certified installers are recommended for flawless results.
Features and Advantages of Microcement
Wide Range of Design Options
Microcement naturally mimics poured concrete for an industrial-rustic vibe but adapts to diverse styles. Add texturing, coloring, metallic effects, or wood-plank simulations for customization. Professionals can create unique showers with specified finishes, textures, and colors.
Common Finishes:
- Polished
- Silky
- Cloudy
- Acid Stain
- Smooth
- Metallic
- Patina
- Rustic
- Matte
Minimal Renovation Required
Apply over existing stable surfaces without demolition. Refresh by grinding the top layer and reapplying a new coat in a different color.
Luxurious, Modern Aesthetic
Its plaster-like consistency yields a hardwearing, waterproof, seamless surface that elevates bathrooms to luxury status, boosting property value.
Waterproof When Sealed
Forms a monolithic, impervious barrier (enhanced by waterproofing membranes on certain substrates).
Superior Adhesion and Flexibility
Polymer-enhanced formulas provide tensile strength, reducing cracks from minor movements. Bonds to properly prepared materials.
Lightweight
Thin 2–3 mm layers add minimal structural load, ideal for upper floors without reinforced foundations.
Retrofit-Friendly
Suited for any shower size or layout; no wall removal or heavy equipment needed.
Low Waste
Straightforward application (especially with kits) minimizes debris.
Stain-Resistant
Proper sealing prevents easy staining compared to other materials.
Low Maintenance
Groutless design simplifies cleaning; periodic resealing maintains performance.
Cohesive Design
Pair with microcement fixtures like basins or bathtubs for a minimalist, modern look.
Limitations and Disadvantages of Microcement
Skill-Dependent Installation
Even uniform finishes require experienced applicators; improper thin-layer work causes unevenness or cracks.
Labor-Intensive
Multi-step surface prep is critical for quality.
Time-Consuming
Curing between coats, mixing, and prep extend timelines.
Temperature-Sensitive
Apply and cure at 59–77°F (15–25°C) to avoid hairline fractures.
Sealing and Upkeep
Essential for water resistance; periodic resealing prevents infiltration.
Higher Initial Cost
Influenced by finish complexity, substrate, area, and professional installation.
Not DIY-Friendly for All
Requires skill and specialized tools, especially for intricate designs.
Longevity Variability
Durable when installed correctly, but high-traffic showers raise wear concerns.
Damage-Prone
Susceptible to scratches or dents from sharp impacts.
Fewer Design Options Than Tiles
Variety in colors/textures exists, but tiles offer more patterns.
Professional Installation Recommended
Adds to costs but ensures quality.
How to Install Microcement in a Shower
1.Protect Surroundings: Cover fixtures (sinks, toilets, hardware) to avoid spills. Activate workability with superplasticizer as needed.
2. Surface Preparation: Clean substrate of debris, water, sealants, paint, soap, or grout. Patch holes/cracks with waterproof putty.
3. Level the Surface: Eliminate depressions and bumps.
4. Apply Primer: Use a bonding agent to promote adhesion, control moisture loss, and ease first-coat application. Fill tile grout lines if applicable.
5. Base Layer: Mix per instructions (include polymer liquid; avoid lumps/bubbles). Trowel evenly at 1–2 mm (or 0.1 mm per manufacturer).
6. Sand Between Coats: After curing, use 180–200 grit to smooth without creating lows.
7. Second Coat: Apply after 24 hours (or as specified); trowel evenly.
8. Texturing: Use trowels, sponges, or brushes for desired effects (requires skill).
9. Coloring: Select pre-dyed microcement or paint over a sanded/reapplied base layer.
Sealing Microcement
Choose microcement-specific sealers that block water while allowing breathability. Clean surface first, then apply evenly via brush, roller, or spray. Cure per product guidelines (hours to days); add coats as recommended.
Application Tips
- Over Tiles: Use varnish-formulated products to seal completely and minimize prep.
- Primer: Stick to manufacturer-recommended for compatibility.
- Tools: Employ corner trowels for seamless edges.
- Maintenance: Reapply sealer regularly; avoid harsh cleaners (test small areas).
- Practice: Test on samples before full application.
- Follow Guidelines: Adhere to brand-specific mixing, techniques, and curing for warranties.
- Warranties: Compliance ensures coverage for issues.
Request a Custom Finish Sample
© 2026 Got Stucco. All rights reserved.
Custom finish samples and project portfolios are available upon request.
Explore custom Venetian plaster, microcement, and decorative finish samples created to complement your project’s color palette, materials, and design vision.